Thursday, May 17, 2012
Table Project
It seems like it's taken me a long time to finish this project. Maybe because I've had about 5 side projects going at the same time and I can only work on this in daylight. Pinterest has kept me quite busy. With Avery's upcoming birthday I've been getting too many ideas, been doing too much shopping and am way over my head with birthday. We'll see what happens.
With the impending birthday and summer, I knew we were going to be spending a lot of time outside. We have been blessed with a pretty nice backyard, plenty of sun and shade. Unfortunately there's not a whole lot of landscaping that I can play with. It's mostly palm trees and bark on the ground. When we moved there was this hideous table in the back. I'm still not sure what they actually used it for. It was warped beyond belief! It was an ugly eye sore and I didn't really have a place to hide it. So, I decided to do something with it. I don't think the owners would be upset :).
I had a couple different ideas floating around. First I just wanted to make it a normal table, like buffet style type of table. I figure I would sand it down, replace the top and voila! Table. Then I remembered how at my first apartment I had a mini herb garden on the rails leading to my apartment. It was so nice to go out and grab some fresh herbs to throw into food. Now that I'm cooking a lot more and don't always have the fresh ingredients to use. The spices I do have are the ones that came with the set at our wedding! We're headed to year 5. I know, gross. We decided to go the herb garden route.
So, off I go...
I started with removing the towel bar and the incredibly warped top. Then I sanded the whole thing down which I thought would take a lot longer because of all the nooks and crannies. Then I did measurements to see how I wanted to go about putting a box in there for the herbs. We ran into some problems then. The opening of the table was 12.5" and everything I was finding was only 12". I searched so many places but no dice. Everything was either 7" or 12". Also the length was 39". So there was 12x40 boxes. Ugh. So frustrating!! We took a trip to Lowe's and got a couple Hefty storage containers that were 12x16" I got two of them and sprayed them down. I also bought a piece of wood that was 1x2x8". I got those cut into two 42' pieces, sprayed them black in the garage, and drilled them to the top to add the extra 1/2 inch I needed. I also sprayed the boxes down. I chose a dark red color. I was going to antique it a bit and sand a bit after the red color, but at this point I opted not to.
The second I opened the drop cloth I got this nasty papercut from the cardstock paper in it. It actually spread to both fingers. Hurts like a mother! And still does!
My battlewound:
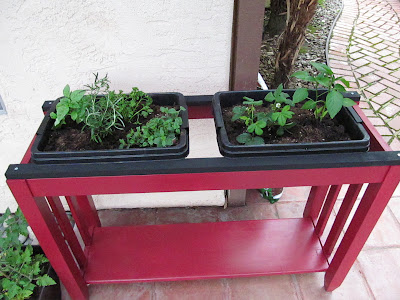
I had a few hiccups during the whole process, but it's DONE! I got herbs today. Basil, parsley, oregano, and rosemary for the first box. The second box I got green peppers and strawberries. I ended up getting a second planter box to put in some tomatoes. I wanted to get roma and a bigger type of tomato, but I ended up buying two romas :(. Now after I planted everything today, I realized that I didn't drill holes in the bottom of the box for drainage. Also I have figure out the bottom for when it does drain.
Heres the finished product!!
I also got a hanging flower pot and added these.
All in all I'm SO excited that this worked out! I hope that we see fruits of our labor :).
Subscribe to:
Post Comments (Atom)


Love it! Good job! Can't wait for the next post on growing progress!
ReplyDeleteOK, so I'm a month late here (such a faithful blog reader, I know) but WOW! Awesome job! I'm so impressed and inspired. I need to refinish the table in the backyard and have hesitated because deep down (well, not very deep down) I see a non-handy lady inside. But you have made me feel like DIY is doable! yay! Also, I want herbs too. Its so fun to cook with the fresh stuff. P.S. I am sure some of my herbs are from my wedding too. Yeah. haha
ReplyDelete